Keurig Sickness: Mold and Its Symptoms
Keurig Sickness isn’t a medical diagnosis; it’s a term used to describe health concerns related to using Keurig machines. It’s not a widespread issue, but it’s essential to grasp the potential risks, especially when mold enters the picture.
Mold, that pesky fungus, can find its way into your beloved Keurig coffee maker. When it does, it can become a cause for concern. This isn’t because mold is inherently evil, but because inhaling or ingesting mold spores can lead to health issues. That’s why mold becomes a key player in the Keurig Sickness scenario.
The relevance of mold in Keurig Sickness is all about understanding its presence, its potential health impact, and how to prevent it. In the next sections, we’ll dive deeper into the specifics – from what happens when you drink moldy coffee to spotting those telltale symptoms of Keurig Sickness. So, grab your coffee (hopefully mold-free), and let’s explore further.
Mold in Keurig Machines
How Mold Develops in Keurig Machines?
Mold, the unwanted guest in your coffee maker, can develop in Keurig machines for several reasons:
- Moisture and Warmth: Keurig machines create a warm, moist environment, which is an ideal breeding ground for mold. Water residues left behind after brewing can provide the moisture mold needs to thrive.
- Coffee Grounds: Coffee grounds can get stuck in various parts of your Keurig, creating a welcoming environment for mold growth. Mold can feed on these leftover coffee bits.
- Infrequent Cleaning: Neglecting regular cleaning allows mold to take root. Over time, it can colonize different parts of your machine, from the water reservoir to the internal tubing.

Conditions Predisposing Keurig Machines to Mold Growth
Certain conditions make Keurig machines more prone to mold infestations:
- Dark, Damp Spaces: Keurig machines often have hidden, dark nooks and crannies that are hard to see and clean. These spaces are a perfect shelter for mold.
- High Humidity Areas: If you live in a humid climate, your Keurig is at a higher risk of mold growth. Mold loves humidity and thrives in it.
- Infrequent Use: If you don’t use your Keurig regularly, stagnant water can linger in the machine, promoting mold growth. This is especially true for machines in vacation homes or those used sporadically.
Identifying Keurig Sickness Symptoms
Let’s delve into the symptoms of Keurig sickness. We’ll discuss each of them in detail to help you understand what to watch out for:
Upset Stomach: If you’ve ever felt queasy, experienced indigestion, or had a touch of nausea after your Keurig coffee, it could be a sign. Your stomach may not be thrilled with something in your brew.
Diarrhea: Frequent trips to the bathroom following your morning Keurig fix can be an indicator. Coffee-induced diarrhea is far from a pleasant way to start your day.
Abdominal Pain: Persistent discomfort or cramps in your belly? It might be linked to your Keurig machine. Your digestive system may be reacting to something it doesn’t like.
Headaches: A throbbing headache after sipping your Keurig coffee? It could be due to the chemicals or mold. Headaches can be your body’s way of saying, “Something’s not right here.”
Allergic Reactions: Skin rashes, itching, or hives that appear after enjoying your coffee could signal an allergic response to a component in your Keurig brew.
Respiratory Issues: Coughing, wheezing, or shortness of breath following your coffee? It might be a reaction to inhaling mold spores from your Keurig machine.
Fatigue: Feeling unusually tired even after your morning caffeine boost? Keurig sickness could be leaving you drained, literally.
Flu-like Symptoms: Chills, fever, and muscle aches that seemingly appear out of nowhere after your coffee might be indicative of Keurig-related illness.
Digestive Issues: Frequent gas, bloating, or an unsettled tummy? It’s possible that something in your Keurig coffee isn’t sitting well.
Unexplained Weight Loss: Losing weight without trying? Keurig sickness can affect your appetite and lead to unexplained weight loss.
These symptoms may not exclusively point to Keurig sickness, but if they consistently occur after your Keurig coffee, it’s important to take notice.
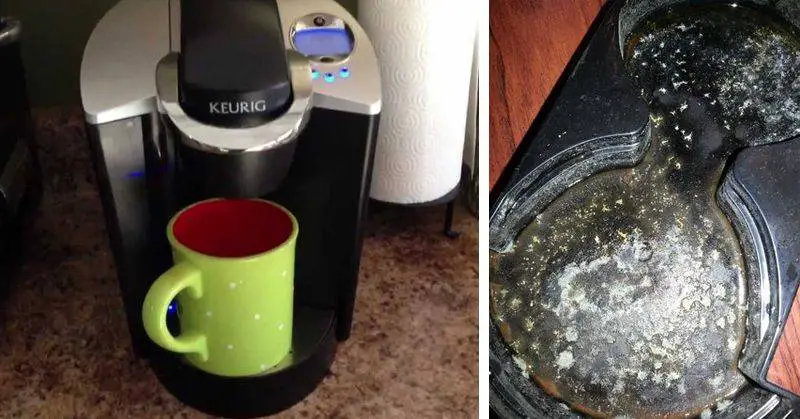
Recognizing a Moldy Coffee Maker
Here are some indications that your coffee maker might be harboring mold:
1. Musty Odor: If your coffee maker emits a musty or mildew-like odor, it’s a strong sign that mold has taken up residence. This odor can be particularly noticeable when brewing a fresh pot.
2. Visible Mold Growth: Inspect the water reservoir, coffee pot, and any removable parts for visible mold growth. Mold can appear as dark or fuzzy patches in various areas of the machine.
3. Off-Flavors in Your Coffee: If your coffee consistently has an unpleasant or moldy taste, this suggests that mold might be contaminating your brew.
4. Discolored Water: If the water you pour into the coffee maker appears discolored or murky, it could be a sign of mold in the reservoir or water lines.
5. Residue Buildup: Mold can leave behind residue in the form of slimy or gritty deposits in the coffee maker’s components. Check for any unusual buildup when cleaning the machine.
6. Health Symptoms: If you or others in your household experience unexplained health issues like respiratory problems, skin irritations, or digestive discomfort after consuming coffee from the machine, it might be linked to mold contamination.
Recognizing these signs is essential for addressing the issue promptly. In the next section, we’ll discuss how to effectively clean a moldy coffee maker and prevent mold growth in the future.
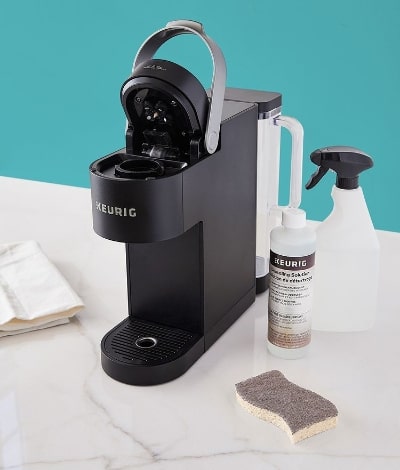
Cleaning and Maintenance to Address a Moldy Coffee Maker
Now that you know the symptoms and potential risks of Keurig sickness related to mold, it’s time to take action and ensure your coffee maker is clean and safe. Here’s a step-by-step guide to cleaning a moldy coffee maker:
Step 1: Gather Your Cleaning Supplies
Before you begin, make sure you have the necessary cleaning supplies on hand. You’ll need Keurig solution (or white vinegar), water, a clean cloth, and mild dish soap. Ensure the coffee maker is unplugged.
Step 2: Disassemble the Coffee Maker
Start by disassembling the removable parts of the coffee maker. This typically includes the water reservoir, drip tray, and any other removable components.
Step 3: Clean Removable Parts
Wash the removable parts with warm, soapy water. Scrub them thoroughly to remove any residue, coffee stains, or mold growth. Rinse them well and let them air dry.
Step 4: Prepare a Cleaning Solution
Mix a solution of equal parts solution and water. For most Keurig machines, a cup of each should suffice.
Step 5: Clean the Machine
Pour the solution and water mixture into the water reservoir. Place an empty cup or mug on the drip tray.
Step 6: Run the Cleaning Cycle
Start a cleaning cycle on your coffee maker. This will vary depending on your machine’s model, so refer to the user manual for specific instructions. The solution will flow through the machine, cleaning and descaling it.
Step 7: Rinse with Fresh Water
After the cleaning cycle is complete, empty the cup and reservoir. Refill the reservoir with clean, fresh water and run a cycle with just water. This will help rinse out any remaining solution.
Step 8: Wipe Down the Exterior
While the machine is running the water cycle, use a clean cloth and soapy water to wipe down the exterior of the coffee maker. Pay attention to buttons, handles, and any areas that may have coffee splatters.
Step 9: Reassemble and Test
Once the water cycle is complete, reassemble the coffee maker by putting all the removable parts back in place. Make sure everything is dry and clean. Plug in the machine and test it by brewing a cup of plain water. This ensures that any lingering solution or residue is flushed out.
By following these steps regularly, you can maintain a clean and mold-free coffee maker, reducing the risk of Keurig sickness and enjoying your coffee with peace of mind.
5 Tips on Preventing Mold Growth in Coffee Makers
Now that you’re familiar with the symptoms of Keurig sickness, let’s talk about keeping your coffee maker mold-free. Mold isn’t something you want in your cup, and preventing it is key. Here’s how to ensure your coffee maker stays clean and your coffee remains safe to sip:
1. Regular Cleaning and Drying
After each use, clean and dry all removable parts of your coffee maker, including the water reservoir, drip tray, and K-Cup holder. Mold thrives in damp environments, so keeping things dry is crucial.
👉 Learn how often to clean keurig
2. Change the Water Regularly
Stagnant water can be a breeding ground for mold. Change the water in your coffee maker frequently, especially if you don’t use it every day.

3. Frequent Charcoal Filter Replacement
If your coffee maker has a charcoal filter, replace it at the recommended intervals. These filters can trap impurities and, if not changed, can contribute to mold growth.
👉 Learn how to replace keurig water filter
4. Proper Coffee Storage
Store your coffee properly. Keep coffee beans or grounds in an airtight container in a cool, dry place. Moisture is the enemy, and sealing your coffee can help prevent mold from forming in your coffee supply.
5. Clean and Dry Reusable K-Cups
If you use reusable K-Cups, ensure they’re cleaned and dried thoroughly after each use. These can be a hiding spot for mold if not maintained.
Final Words
All in all, being aware of the symptoms of Keurig sickness is crucial for enjoying your daily brew without any health concerns. If you ever experience persistent symptoms after your Keurig coffee, it’s wise to investigate the cause and, if necessary, take steps to prevent any further discomfort.
Remember, a clean and well-maintained coffee maker is your best friend in the pursuit of a delicious and health-conscious coffee experience.
Hi, I just wanted to say how fantastic this article is—it’s nicely written and has nearly all of the important details. I hope to see more content similar to this one.
I appreciate you sharing this blog post. Thanks Again. Cool.