
Do you ever wonder why your morning cup of coffee doesn’t taste as good as it used to? Or why your Keurig seems to be working a little less efficiently than when it was fresh out of the box? The answer might be simpler than you think – it’s time to replace your Keurig water filter.
In this quick guide, we’ll walk you through the straightforward process of replacing your Keurig water filter. No more wondering why your brew isn’t up to par or dealing with sluggish water flow. By the end of this post, you’ll be sipping on that perfect cup of coffee once again, and you’ll wonder why you didn’t do this sooner. Let’s get started!
When to Replace the Keurig Water Filter?
Ensuring Optimal Performance
You might not think about it often, but the Keurig water filter is an unsung hero in delivering a consistently great cup of coffee. To maintain that level of excellence, it’s crucial to replace the filter at the right time. Let’s explore when and why it’s important to do so.
How Often Should You Replace the Keurig Water Filter?
The golden rule for replacing your Keurig water filter is every two months. This timeline ensures that your filter remains effective in removing impurities and enhancing the taste of your coffee. By sticking to this schedule, you’re proactively safeguarding your coffee’s flavor profile.
But, keep in mind that the two-month guideline is approximate and can vary based on usage. If you find yourself brewing multiple cups of coffee every day, you might need to replace the filter a bit sooner. On the other hand, if you’re an occasional coffee drinker, you could stretch it a bit longer.
Signs It’s Time for a Replacement
Beyond the two-month mark, there are several telltale signs that indicate your Keurig water filter is due for a replacement:
- Taste Discrepancies: If you notice a shift in the flavor of your coffee, it could be a sign that the filter is losing its effectiveness. Replacing it can help restore that delicious, familiar taste.
- Slow Brewing: A noticeable slowdown in the brewing process, where it takes longer to fill your cup, is often linked to a clogged filter. A new filter can revitalize your Keurig’s efficiency.
- Water Quality Issues: When you spot particles or impurities in the water as it flows into the reservoir, it’s a clear indication that the filter isn’t doing its job anymore. Replacing it will help you enjoy pure, clean water for brewing.
- Reservoir Buildup: Inspect the water reservoir. If you notice mineral deposits or a slimy residue, this is another sign that your filter isn’t performing optimally.
To put it simply, keeping track of the two-month rule and being vigilant for these signs will help you determine precisely when to replace your Keurig water filter. Don’t wait for your coffee to taste off or your brewing process to slow down. Regular replacement is the key to maintaining the exceptional coffee quality your Keurig is capable of delivering.
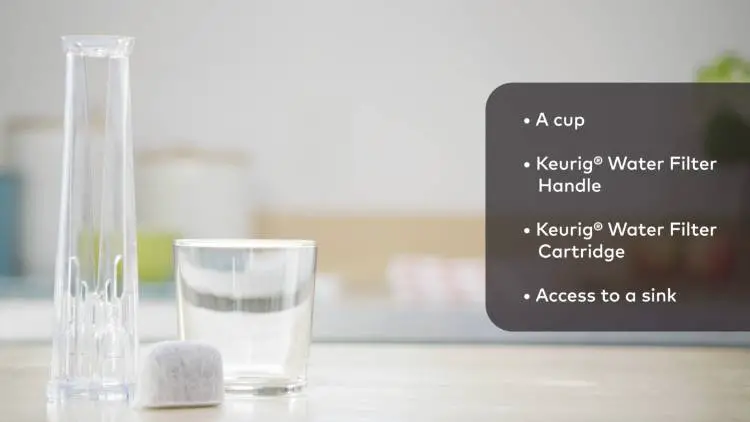
How to Replace the Keurig Water Filter?
Replacing the water filter is a simple yet crucial task in maintaining the quality of your coffee. Follow these step-by-step instructions to ensure your Keurig is always ready to brew the best.
Step 1: Removing the Old Filter
Note: Always ensure your Keurig is unplugged and powered off before starting any maintenance.
- Begin by opening the lid of the water reservoir. Inside, you’ll find the old water filter. It’s usually located in a small compartment.
- Gently pull out the old filter. It may be attached to a plastic frame; simply remove the frame along with the filter.
- Dispose of the old filter responsibly. You can’t reuse it, and it’s time for a fresh one.
Step 2: Soaking the New Filter in Water
Note: Using clean water for soaking is essential. It ensures that no impurities are introduced to the new filter.
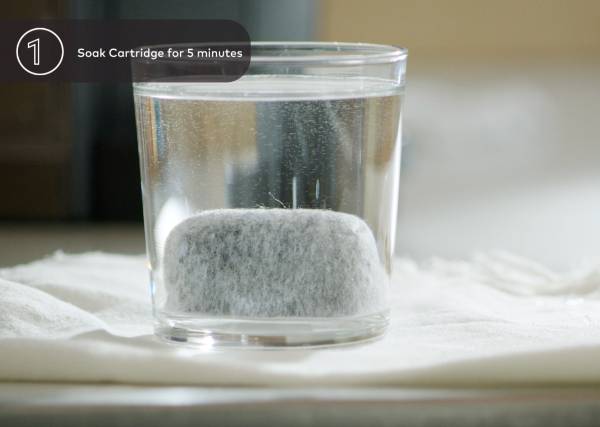
- Take your new Keurig water filter, still in its packaging, and submerge it in a cup of clean, room-temperature water.
- Let it soak for about five minutes. This step allows the filter to absorb water, preparing it for efficient filtration.
Step 3: Rinsing the New Filter
Note: A thorough rinse ensures that any loose charcoal particles are removed. This is essential to prevent any potential off-flavors in your coffee.
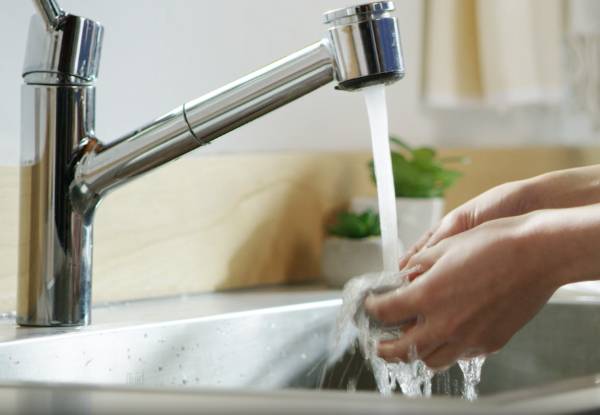
- After soaking, remove the filter from the cup of water.
- Hold the filter under a gentle stream of cold running water for about a minute, making sure to rinse all sides of the filter.
- This rinsing step is crucial to clear away any loose charcoal particles or dust that might be present in a new filter.
Step 4: Inserting the New Filter into the Filter Holder
Note: Proper placement of the new filter is essential for effective water filtration. Take your time to ensure it’s seated securely.
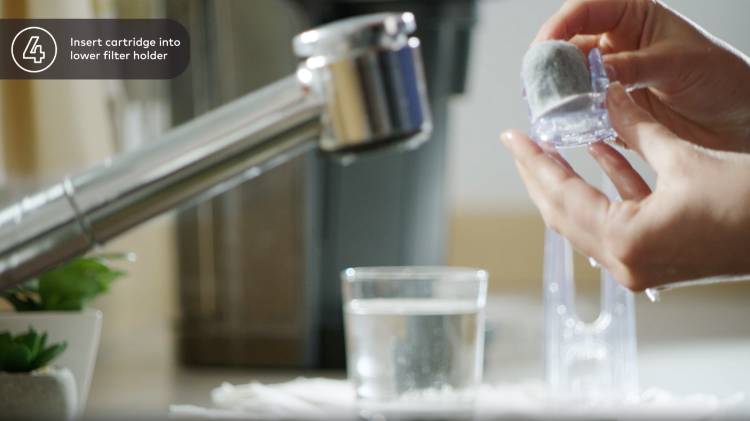
- With the new filter now saturated and rinsed, it’s time to insert it into the filter holder. The filter holder is usually located inside the reservoir.
- Make sure the filter fits snugly and securely within the holder.
- Pay attention to any orientation guides or markings provided by Keurig to ensure correct placement.
Step 5: Reattaching the Filter Holder to the Water Reservoir
Note: Reattaching the filter holder is the final step in ensuring your water flows through the new filter before reaching your coffee grounds.
- After inserting the new filter into the holder, reattach the filter holder to the bottom of the water reservoir. It often clicks into place.
- Ensure that it’s firmly secured. This step guarantees that your water will be adequately filtered before brewing.
By following these steps and paying attention to the notes, you’ll replace your Keurig water filter with confidence and precision. This seemingly minor maintenance task significantly contributes to the quality and taste of your daily brew. Your Keurig will continue to serve you exceptional coffee with every cup.
Tips for Maintaining the Keurig Water Filter
Regularly Cleaning the Filter Holder
Over time, the filter holder can accumulate coffee residue and mineral deposits, which can hinder water flow and affect the taste of your coffee. To prevent this, make it a habit to clean the filter holder regularly. Here’s how:
- Remove the filter from the holder.
- Rinse the filter holder thoroughly with warm, soapy water.
- Use a soft brush or toothbrush to gently scrub away any stubborn residues.
- Rinse again and allow it to air dry completely before reassembling.
Using Filtered Water in the Keurig
The quality of water you use directly impacts the lifespan and performance of your Keurig water filter. Whenever possible, use filtered water in your Keurig. Filtered water contains fewer impurities and minerals, which can accumulate and clog the filter faster when using tap water.
Filtered water not only extends the life of your filter but also enhances the flavor of your coffee, providing a pure and crisp taste. If you don’t have a built-in water filtration system, consider using a water pitcher or faucet attachment with a filter to ensure the water you pour into your Keurig is of the highest quality.
Storing the Keurig in a Dry, Cool Place
Proper storage of your Keurig is another crucial factor in maintaining your water filter. Storing your coffee maker in a dry and cool environment is essential to prevent the growth of mold or mildew, which can potentially affect your filter and the overall performance of your Keurig.
Here are some storage tips:
- Ensure your Keurig is completely dry before storing it.
- Keep it in a place with good ventilation to prevent moisture buildup.
- Avoid storing it in direct sunlight or near a heat source, as excessive heat can damage the filter and other components.
By following these storage practices, you’ll keep your Keurig and its water filter in tip-top shape, ready to brew the perfect cup of coffee whenever you need it.
FAQs
Q: Is there a specific Keurig water filter model I need for my coffee maker?
A: Yes, it’s important to use the specific Keurig water filter model designed for your coffee maker. Keurig machines are designed to work optimally with their own brand of water filters. These filters are typically available on Amazon and most stores that sell Keurig products, making it easy to find the right one for your machine.
Q: Can I use a non-branded water filter replacement with my Keurig?
A: While it’s possible to find non-branded water filter replacements, it’s strongly recommended to use the official Keurig filters designed for your coffee maker. Keurig filters are engineered to meet the quality standards required for optimal performance. Using non-branded filters may affect the taste and quality of your coffee.
Q: Do you need a water filter for Keurig if using filtered water?
A: Even if you use filtered water to fill your Keurig reservoir, it’s still advisable to use the Keurig water filter. The Keurig filter not only improves water quality but also helps prevent mineral buildup and clogs within your machine. It’s an extra layer of protection that ensures your coffee tastes its best and your Keurig functions at its peak.
The Recap
In a nutshell, your Keurig coffee maker is a faithful companion in your daily caffeine routine, and its performance is closely linked to the quality of your water filter. Let’s recap the key takeaways from this post:
- Regular replacement of the Keurig water filter, ideally every two months or after brewing around 60 reservoirs, is vital to maintain the flavor and quality of your coffee.
- Signs like a decline in coffee quality or reduced water flow are clear indicators that it’s time for a new filter.
- We’ve provided you with a simple step-by-step guide for replacing the Keurig water filter, making the process a breeze.
- To keep your filter at its best, remember to clean the filter holder regularly, use filtered water when filling the reservoir, and store your Keurig in a dry, cool place.
By following these guidelines, you’re not only ensuring the optimal performance of your Keurig but also guaranteeing a consistently delightful cup of coffee. So, let’s raise a mug to perfect brews and encourage all coffee lovers in your circle to join you in this pursuit. Regular Keurig water filter replacement is the secret to a consistently excellent coffee experience.