Welcome, coffee enthusiast! If you’re reading this, it’s likely you own the fantastic Keurig Supreme coffee maker. But even the best coffee makers need a little TLC to keep brewing your favorite beverages flawlessly. That’s where descaling comes in.
In this quick and easy guide, we’ll take you step by step through the descaling process for your Keurig Supreme and address common post-descaling issues. So, let’s embark on this journey to maintain your coffee maker’s peak performance.
Signs Your Keurig Supreme Needs Descaling
Is your Keurig Supreme acting a bit off lately? It might be trying to tell you something. Here are some common signs that your coffee maker might be in desperate need of descaling:
Identifying common issues caused by mineral buildup
- Slow Brewing: If your once-speedy Keurig Supreme now seems to take forever to brew a cup, mineral deposits could be to blame. These deposits can clog up the internal components, slowing down the brewing process.
- Strange Tastes: Are you noticing a weird taste in your coffee or a change in its quality? Minerals can affect the flavor and aroma of your coffee, making it less enjoyable.
- Reduced Cup Size: When your Keurig starts serving smaller cups of coffee, it might be due to blocked water lines caused by mineral buildup.
- Noisy Brewing: If your coffee maker suddenly starts making unusual noises, it could be struggling with mineral-related issues.
Why addressing these signs is crucial?
Ignoring these signs can lead to more severe problems with your Keurig Supreme. A neglected coffee maker can suffer from decreased performance and a shorter lifespan. Plus, who wants to start their day with a subpar cup of coffee? Descaling ensures your coffee stays top-notch and your machine stays in tip-top shape.
Materials Needed for Descaling
Now that you’ve identified the signs, let’s gather the materials you’ll need to give your Keurig Supreme the spa day it deserves:
- Keurig® Descale Solution: This is your secret weapon for tackling mineral buildup. It’s specially designed to break down those stubborn deposits and keep your coffee maker running smoothly.
- Water: You’ll need plenty of fresh, clean water for rinsing during the descaling process. It’s best to have a jug or pitcher on hand.
- A Mug: You’ll use this to catch any liquid during the descaling and rinsing steps.
- Sink: You’ll be pouring out some hot liquids, so make sure you have easy access to a sink.
With these materials in tow, you’re ready to embark on the descaling journey to revive your Keurig Supreme.
Step-by-Step Guide on How to Descale Keurig Supreme (Plus)
👇 The following descaling steps apply to Keurig K-Supreme K910 and K-Supreme Plus K920 Brewers.
Step 1: Get Ready
Before we start, make sure your Keurig Supreme (Plus) is powered off and unplugged. Safety first, right?
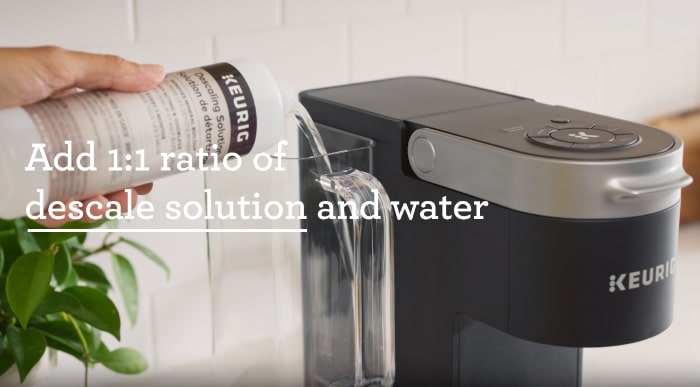
Step 2: Time to Descaling
Grab your bottle of Keurig® Descale Solution, and pour it all into the empty water reservoir. Don’t forget to fill that same bottle with water and add it to the reservoir too. No need for a K-Cup® pod at this stage.
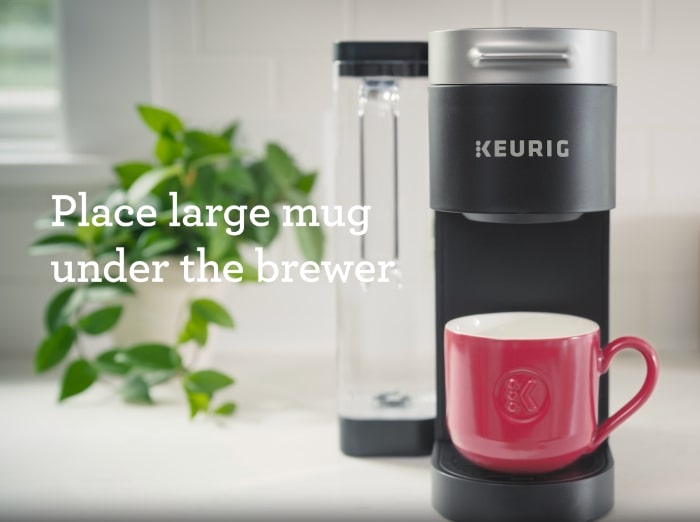
Step 3: Place Your Mug
Put a decent-sized mug on the drip tray. We’re getting ready to catch some hot liquid gold!
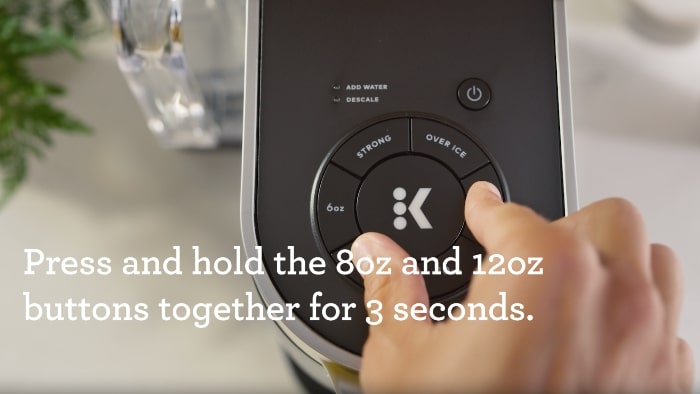
Step 4: Activate Descale Mode
Here’s a fun part! Plug in your brewer and power it on. Now, press and hold both the 8oz and 12oz buttons at the same time for about 3 seconds. When they start flashing, hit that brew button to kickstart the descaling process.
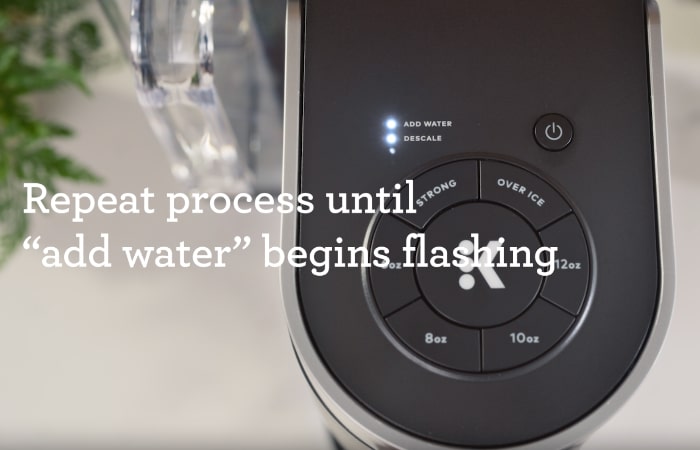
Step 5: Rinse and Repeat
Once the brew is done, carefully pour the hot liquid into the sink. You’re going to repeat this step until the ADD WATER light tells you it’s thirsty.
Step 6: Time for a Fresh Water Rinse
Empty out your water reservoir and give it a good rinse. Now, fill it up to the MAX fill line with fresh, clean water.
Step 7: Rinse Again
When those lights start flashing, it’s rinse time. Press the brew button, and let it work its magic. Once it’s done, pour that hot water down the sink.
Step 8: The Final Countdown
Keep repeating Step 7 until you see that DESCALE notification go away. Your Keurig Supreme (Plus) is now back to normal and ready for some serious coffee action!
Troubleshooting Common Issues After Descaling
So, you’ve successfully descaled your Keurig Supreme, but you’re still encountering some hiccups along the way. Don’t worry; we’ve got you covered with some troubleshooting tips to ensure your coffee experience remains smooth and delightful.
Addressing Lingering Problems or Error Messages
- Slow Brewing: If you’re still experiencing slow brewing, consider giving your coffee maker an extra rinse with plain water. Sometimes, a few more cycles can help clear out any remaining descaling solution or mineral residue.
- Strange Tastes: If your coffee still doesn’t taste quite right, run a few additional water-only cycles. This can help flush out any residual solution or mineral flavors.
- Reduced Cup Size: If your Keurig Supreme is still serving smaller cups, check for any obstructions in the water lines or needles. Clean them thoroughly, as residual minerals might be causing blockages.
- Noisy Brewing: Unusual noises can sometimes persist after descaling. This could be due to air pockets in the system. Try running a few water-only cycles to eliminate any trapped air.
Tips for a Successful Descaling Experience
- Follow the Instructions: Make sure you follow the descaling instructions carefully and precisely. Skipping steps or rushing through the process can lead to incomplete descaling.
- Use the Right Solution: Stick to Keurig’s official descaling solution or an approved alternative like vinegar. Using the wrong solution can cause more harm than good.
- Rinse Thoroughly: After descaling, rinse all components, including the water reservoir, thoroughly with fresh water. This helps remove any leftover solution or mineral residue.
- Regular Maintenance: To prevent the need for frequent descaling, consider using filtered water in your Keurig Supreme. This can help reduce mineral buildup over time.
- Consult the Manual: If you’re encountering specific error messages or issues that aren’t resolved by descaling, consult your Keurig Supreme’s manual for troubleshooting guidance.
By addressing these common post-descaling issues and following these tips, you can ensure a trouble-free and delightful coffee experience with your Keurig K-Supreme or K-Supreme Plus.
How Often Should You Descale Your Keurig Supreme (Plus)?
Recommended Descaling Frequency
The recommended descaling frequency for your Keurig Supreme typically falls within the range of every three to six months. However, this can vary depending on several factors, such as the water hardness in your area, usage frequency, and the type of water you use.
To determine when it’s time to descale your Keurig Supreme, consider factors like the following:
Factors That May Influence Descaling Frequency
1. Water Hardness: Areas with hard water tend to build up mineral deposits more quickly. If you live in such an area, you may need to descale your Keurig Supreme more frequently, perhaps closer to every three months.
2. Usage: How often you use your Keurig Supreme plays a role in determining when to descale it. If you brew multiple cups daily, it may accumulate mineral buildup faster, requiring more frequent descaling.
3. Water Source: The type of water you use can also impact descaling frequency. If you use filtered or softened water, it may slow down mineral buildup compared to using tap water.
4. Visible Signs: Keep an eye out for signs that your Keurig Supreme needs descaling. If you notice slower brewing times, unusual noises, or changes in the taste of your coffee, it’s a good indicator that descaling is overdue.
Maintenance Tips to Extend Your Keurig Supreme’s Lifespan
Preventive Measures to Reduce the Need for Frequent Descaling
- Use Filtered Water: If possible, use filtered water in your Keurig Supreme. This can help reduce mineral buildup and prolong the time between descaling sessions.
- Regularly Clean the Water Reservoir: Rinse and clean the water reservoir at least once a week, even if you’re not descaling. This prevents any residue or impurities from affecting your coffee’s taste.
- Empty the Drip Tray and Pod Bin: Don’t forget to empty the drip tray and pod bin regularly. Standing water or coffee residue in these areas can lead to mold or unpleasant odors.
- Clean the Needle: The needle that punctures the K-Cup pods can get clogged with coffee grounds over time. Clean it with a paperclip or a specialized cleaning tool to ensure it functions properly.
- Avoid Sugary Beverages: While your Keurig Supreme can brew various beverages, try to avoid sugary or syrupy drinks as they can leave sticky residues and require more frequent cleaning.
General Cleaning and Care Tips
- Wipe Down the Exterior: Periodically wipe down the exterior of your Keurig Supreme with a damp cloth to remove any dust or spills. Ensure it’s unplugged when cleaning.
- Descaling as Needed: Follow the manufacturer’s guidelines for descaling your Keurig Supreme. Don’t wait for issues to arise; regular descaling is crucial for optimal performance.
- Check for Leaks: Keep an eye out for any water or coffee leaks around the machine. If you notice any, address the issue promptly to prevent further damage.
- Store in a Dry Place: If you’re not using your Keurig Supreme for an extended period, store it in a dry place to avoid moisture buildup and potential mold growth.
- Replace Parts as Necessary: If you encounter issues with specific components like the water filter or the drip tray, don’t hesitate to replace them to maintain the machine’s functionality.
FAQs
How to reset keurig supreme after descaling?
Resetting your Keurig Supreme after descaling is a straightforward process. Follow these simple steps:
- Ensure the brewer is powered off and unplugged.
- Remove the water reservoir and empty any remaining water.
- Replace the empty water reservoir.
- Plug in and power on your Keurig Supreme.
- The brewer should now be reset and ready for use.
How long does the descaling process typically take?
The duration of the descaling process for your Keurig Supreme or Supreme Plus can vary slightly, but it usually takes around 45 minutes to an hour to complete. This includes the time for the solution to work through the internal components and several rinsing cycles.
What to do if the descale light stays on after completing the descaling process?
If the descale light stays on, unplug the Keurig, wait a few minutes, plug it back in, and turn it on to reset the light.
What are the alternative descaling methods?
Alternative descaling methods include lemon juice, citric acid, baking soda, commercial descalers, denture tablets, and CLR cleaner.
Final Words: Savor the Flavor with Your Well-Kept Keurig Supreme
So there you have it – the ins and outs of descaling your Keurig Supreme. By staying on top of this essential maintenance task, you’re not just ensuring a smooth coffee-brewing experience but also extending the life of your beloved coffee maker.
Remember, a little care today means many more delicious cups of coffee tomorrow. So keep those mineral buildup gremlins at bay, and enjoy your freshly brewed coffee hassle-free. Cheers to great coffee moments!
💡 More Descaling guides on Different Keurig Modes:
👉 How to descale keurig slim?
👉 How to descale keurig slim with vinegar?
👉 How to descale keurig mini?
👉 How to descale keurig duo?
👉 How to descale keurig express & K-iced?
👉 How to descale keurig elite?
👉 Can you descale a keurig with vinegar?


SIMPLETaste Milk Frother Handheld Battery Operated Electric Foam Maker, Drink Mixer with Stainless Steel Whisk and Stand for Cappuccino, Bulletproof Coffee, Latte
8% Off


Zulay Kitchen Powerful Milk Frother Wand With 2 Duracell Batteries - Ultra Fast Handheld Drink Mixer - Electric Whisk Foam Maker for Coffee, Lattes, Cappuccino, Matcha, Hot Chocolate & Creamer - Black
17% Off


Milk Frother, 4 in 1 Electric Milk Steamer,11.8oz/350ml Automatic Warm and Cold Foam frother for Coffee, Latte, Macchiato, Cappuccino, Hot Chocolate
20% Off


Zulay Kitchen Powerful Milk Frother Wand - Mini Milk Frother Handheld Stainless Steel - Battery Operated Drink Mixer for Coffee, Lattes, Cappuccino, Matcha - Froth Mate Milk Frother Gift - Black
38% Off


Veken Coffee Canister with Window, Airtight Stainless Steel Kitchen Food Storage Container, Date Tracker and Scoop for Grounds Coffee Bar Accessories, Beans, Tea, Flour, Cereal, Sugar, 22OZ, Black
21% Off


